1.右上角 File –> New –> Zend Guard Project 后出现如下
2.选择好加密后存入的路径后点next(下一步),点击Add Folder添加需要加密的文件。
3.然后选择版本,最后点完成。传说选择PHP5.2版本容易被破解。
4.右击项目名,选择绿色箭头的图标(Encode Project)点击.
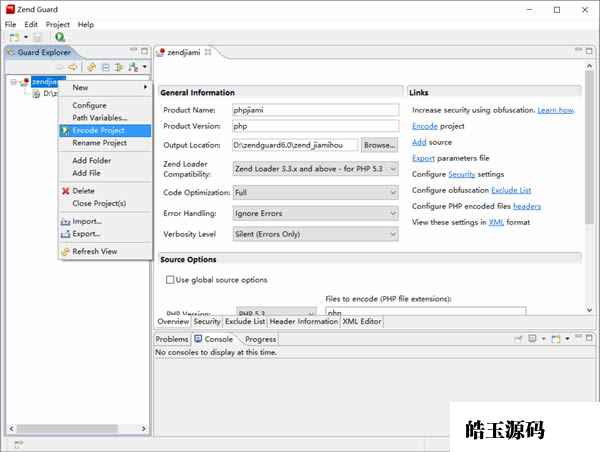
5.当控制台显示 the operation has completed successfully.时说明加密成功了!
下图是加密后的文件的效果!

license 界面:
当启用了license,我们需要先生成一个 license key,然后再生成 license。
Security:生成序列号,产品期限授权,加密与混淆设置
首先配置Configure License Keys,Generate生成 License Key,然后选择Generated License Key

Configure License Keys

PHP使用Zend Guard 6.0加密方法讲解
生成的license授权文件后缀是 .zl,比如 test1.zl,里面的内容大致如下:
Product-Name = test1
Registered-To = test1.com
Hardware-Locked = No
Com = www.Piaoyi.org
Expires = 28-Jan-2015
Produced-By = Zend Encoder trial
Verification-Code = wG5ff2uhlyRRrgS8JeqQLEbEpL+rAhQTMVHXZq+9PYFkxV0BfDxID3Cl6Q==
当启用了license授权后,在php.ini就需要配置 zend_loader.license_path= 的值了。比如:
zend_loader.license_path=/Users/CCMAC/Zend/test1/test1.zl
如果不配置 license路径,就是提示php警告:
PHP Warning: No license for this product (test1) - make sure zend_loader.license_path is properly configured in your ini file! in /Users/CCMAC/php/zend/1.php on line 0
PHP Warning: License check failed! in /Users/CCMAC/php/zend/1.php on line 0
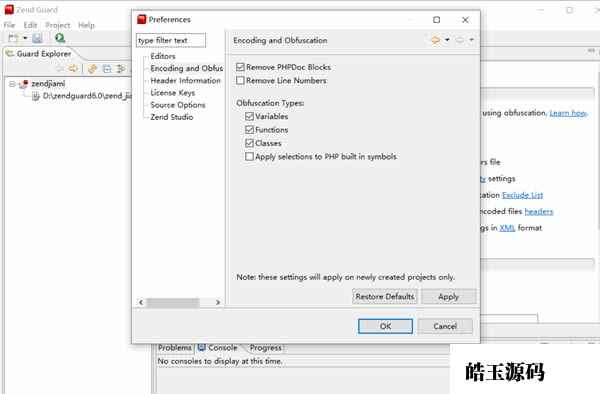
打开混淆设置Edit->Preferences->Encoding and Obfuscation
混淆设置如下:
PHP使用Zend Guard 6.0加密方法讲解更多待补充。。。。。
如何为 php 服务器安装 zend guard loader 的说明:
MAC下的安装步骤(参考):
1、下载 Zend Guard Loader 6.0.0 (for PHP 5.3 or 5.4) ,网址: http://www.zend.com/en/products/guard/downloads
文件是:Zend Guard Loader (Runtime for PHP 5.4) 6.0.0,类型:DMG。
Mac下载地址:http://downloads.zend.com/guard/6.0.0/ZendGuardLoader-70429-PHP-5.4-darwin10.7-x86_64.tar.gz
2、从压缩包里提取 ZendGuardLoader.so (Linux) or ZendLoader.dll (Windows) ;
mac下的ZendGuardLoader.so,只有3.3版本的。
3、编辑php配置文件 'php.ini' :
zend_extension = /usr/local/lib/php/ZendGuardLoader.so ##路径根据实际情况而定
zend_loader.enable=1
zend_loader.disable_licensing=0
zend_loader.obfuscation_level_support=3
zend_loader.license_path=
4、如果你同时使用 Zend debugger,请确保在 Zend Guard Loader 加载之后加载.
5、如果你使用 ioncube loader,请确保在 Zend Guard Loader 加载之前加载.
6、重启 Web server.
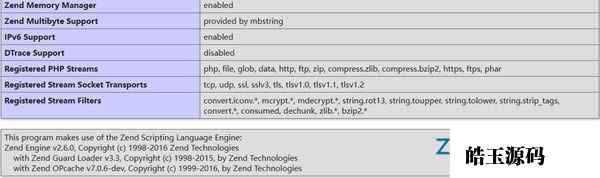
安装完毕后,用 phpinfo() 函数查看,有这类描述:“ with Zend Guard Loader v3.3”,出现下图即为成功: